Installation Guidelines
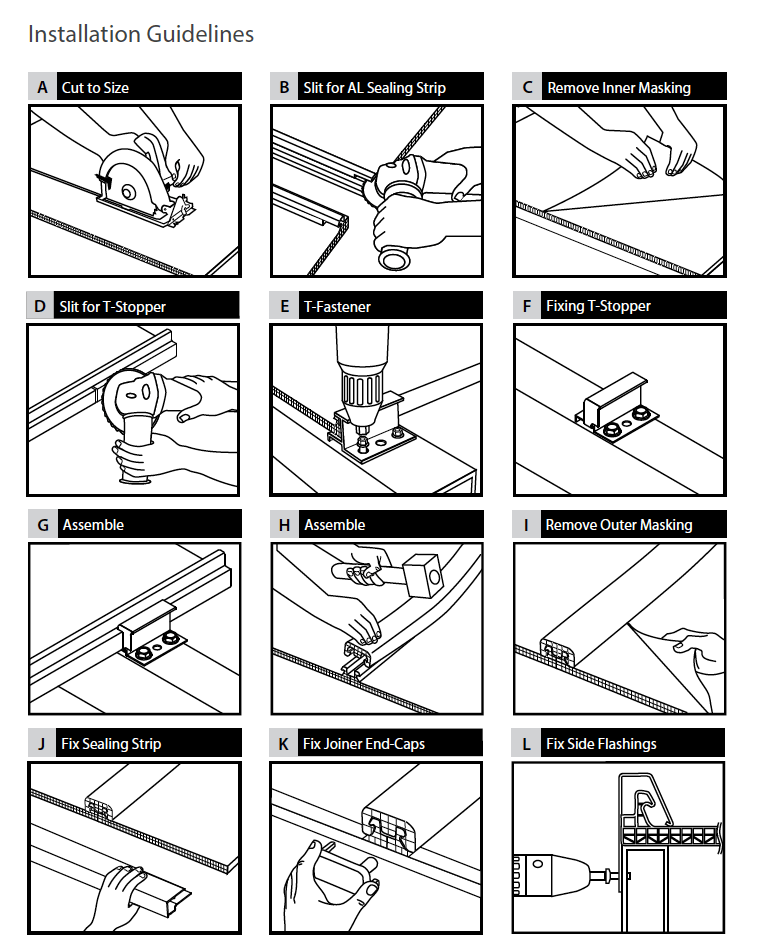
1. Cut to size (A):
CCut panels to length allowing for an overhang of no more than 100mm at each end. A penetration of minimum 50mm into the gutter is recommend. Use a circular or hand saw with fine tooth blades for easier and more precise cutting.
2. Slit for Aluminum Sealing-Strip (B):
Using a small cutting disc (2mm thick), prepare 18mm deep horizontal cuts at each end of the panel teeth. This cut should be in parallel to the panel top face, but without damaging the panel surface. Since this step needs precision, it is highly recommended to perform this action at ground floor level.
3. Remove cutting chips:
Use a vacuum cleaner or an air compressor with blow gun to blow out any “swarf” or loose particles from inside the panel. Make sure that both ends of panel are not covered with the protective film.
4. Position first panel:
To achieve a symmetric installation, determine the layout of the first panel, starting at the center of the structure. Measure the structure’s width, to determine using odd or even number of the prepared panels. Accordingly, mark on the support purlins the location of the middle panel or middle pair of panels. For “side to side” installation, set up the first panel, fitted to the side flashing at the preferred starting side.
5. Remove inner masking (C):
Remove the protective film from the internal face only. Keep this side away from the roof purlins until final positioning of the panel, to avoid scratching.
6. Fix T-Stopper (D, F & G):
The T-stopper’s main function is to create a fix point (zero movement) for each panel. This will allow to control the direction of thermal expansion and contraction, and prevent the panels from shifting due of gravity. Fix the T-Stopper using hex head fixings provided while considering the following recommendations:
Curved application: The T-stopper will be normally fixed at the peak.
Roof end with no gutter: The T-stopper shall be fixed at the last purlin in order to eliminate differential movements (esthetics).
Roof end with gutter: The T-stopper shall be fixed the opposite of the expansion allowance.
Wall Application: The T-Stopper should be fastened at the end of the panel where thermal expansion cannot be accommodated.
In this method all thermal expansion is directed to the opposite end of the panel. Proper spacing must be calculated.
7. Fix T-Fasteners (E):
Along panel on remaining purlins (see span table for rafter design), place T-fasteners against panel and fix into place using hex head fixings provided (2 fixings for standard, 3 fixings for high wind areas and hurricane regions).
8. Position next panel:
Remove protective film from underside of second panel and place against T fasteners.
9. Locking the two panels together (H):
Using a rubber mallet, start to fix the Joiner, locking the 2 panels together by striking with short intervals (5-10cm) along the joiner. Start at the bottom end, and work your way up the roof (ensure that the joiner overhangs the panel ends by 13mm, where the aluminum sealing strip will be installed later).
10. Remove outer masking (I):
Shortly after installation, peel off the protective film from the panel’s external face. Delaying removal of the protective film can make it very difficult or impossible to peel off later on. On exceptionally hot days, remove top protective film immediately to prevent it from bonding with the panel.
11. Repeat steps 5 to 9 (or 11) until all panels are in place except for the external panels.
12. Determine width of end panels required. Using a circular saw (fitted with fine tooth blade) or jigsaw cut the external side panels to width.
13. Along the cut edge of the SUNPAL panel, push on the aluminum F section (cut to size) so that it is firmly secured.
14. Lift the end panel into place and repeat step 9 (or 9-11). The aluminum F section should be firmly affixed against last rafter or end of purlins (note: if fixing to metal purlins, make sure the ends of the purlins are closed off ).
15. Fix the F-Section to the rafter or end of purlin using Tek screws.
16. Start installing the U-Profile at the panel top end by pushing on. It is designed to be a tight fit, so start by pushing one end on and slowly tap it until it is firmly inserted. Polycarbonate U-Profile (for SUNPAL 8mm and 10mm) is to tap by hand, for Al U-Profile (SUNPAL 18mm) and 20mm) use a rubber mallet.
17. Start installing the Aluminum Sealing Strip (J) at the panel bottom end by pushing it on. It is designed to be a tight fit, so start by pushing one end on and using a mallet slowly tap it until it is firmly inserted. These sealing strips are necessary to prevent penetration of dirt end moisture.
18. Joiner End-cap fixing (K):
Insert Joiner End-cap in both Joiner ends. The End-cap for Polycarbonate Joiner is pushed into place. The End-cap for Aluminum Joiner is fit with screws. There is no need to use silicone sealants or adhesives of any kind.
19. Side flashings (L):
These are used on both sides of the structure as fasteners as well as flashings. They are fit either for full width or cut-to-size panels. Application-specific flashings are required in some situations. End-caps should fit to these flashings on both ends.
Notes:1. SUNPAL system does not require using silicones or adhesives for parts interface. For sealing of flashing assemblies use only PALRAM approved accessories, silicones, sealing tape, closure fixtures etc.
2. For cleaning SUNPAL multi panels use a pressure cleaner and allow natural drying. Do not use cloth/ sponge/ chamois or similar, doing this can scratch the panels and harm their performance.
