Installation Guidelines
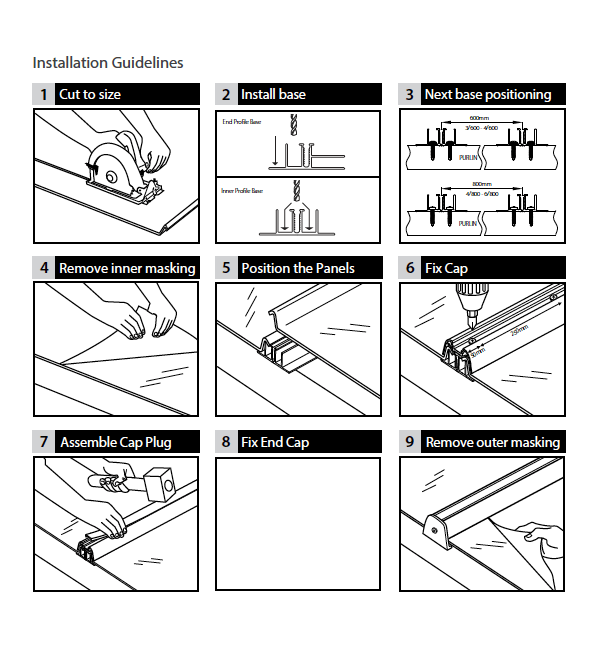
1. Cut to size (Fig. 1)
Cut aluminum profiles to length, allowing for overhangs of up to 100mm at each end. An overhang of minimum 50mm over the end-purlin into the gutter is recommended. Cut panels to length, 20mm shorter then aluminum profiles for expansion allowance. Use a circular saw or hand saw with fine tooth blades and moderate feeding rate for easier and finer cutting.
2. Pre-Drilling (Fig. 2)
Measure and predrill 1/4” screw holes in each End Profile Base and Inner Profile Base.
3. End Profile Closure (Fig. 2)
Fasten a Profile Closure to the bottom end of every End Profile Base and Inner Profile Base.
4. Fix base profile (Fig. 2)
Set the first base profile at the precise center line of the supporting structure, and fix it to the structure using the provided fixing screws. Fix screw at each purlin or by the recommended span on a rafter. Locate the fixing screws at both base sides - two screws for every junction between base and purlin.
5. Fix next base profile (Fig. 3)
Locate center line of next base profile at 600mm (for 3/600 and 4/600) or 800mm (for 4/800 and 6/800) from prior base center line, and fix it as describe in step 2.
IMPORTANT! Measure and mark the Base center line at every purlin, or at every screw location on a rafter. It is highly advisable to prepare and use a spacer rod. (Note: in order to avoid accumulated deviations, do not fix more then 1-2 base profiles ahead of actual assembly).
6. Remove inner masking (Fig. 4)
Remove the protective masking from the panel back surface (the face to contact the purlins). Keep this side away from the roof purlins until final positioning of the panel, to avoid scratching.
7. Position panels (Fig. 5)
Position the panels onto the bases. Make sure the panels are correctly seated along their whole length.
8. Lock cap (Fig. 6)
Position Cap onto the base and panels edges. Pre-drill 6mm holes along the positioning groove every 250mm, it is recommended to safely perform pre-drilling in advance on the ground). Fix the Cap with locking screws through the pre-drilled holes and into to the base profile. The screws on both ends of the cap should be located 50mm from each profile end.
9. Insert cap plug (Fig. 7)
Click Cap Plug into place on top of the Cap using a rubber mallet, performing moderate strikes with short intervals.
10. Fix end closure (Fig. 8)
Fix End Closure at the bottom end of the aluminum profiles (gutter end) - it is recommended to fix the end closure on the ground.
11. Remove outer masking (Fig. 9)
Remove the protective masking from the panel’s external face shortly after installation. Delaying removal of the masking can make it very difficult to remove later. (Note: on hot days remove top protective film immediately after installation to prevent film from bonding to the panel!)
12. Repeat stages 3 to 9.
13. Cut side panels to size
Determine width of the required side panels and cut to size. Use a circular saw or hand saw with fine tooth blades with moderate feeding rate for easier and finer cutting.
14. Side flashings
These purpose made flashings are not supplied by Palram, and are used on the structure sides, as a fastener as well as a flashing, when end panels width is cut to size.
Notes:1. Sunglaze system does not require using silicones or adhesives for parts interface. For sealing of flashing assemblies use only Palram approved accessories, silicones, sealing tape, closure fixtures etc.
2. To clean Sunglaze panels, use a pressure washer with a fanned spray nozzle and allow natural drying. Do not use cloth, sponge, chamois or similar accessories. Doing this might scratch the panels and harm their appearance
